hee hee, hurry up and get your smelly butt down here, duk duk! we still have to grease the ramp and our new crash rail and we still have to test the prototype uknowwhats filled with uknowwhatsmellyelse and we have to do it all before mom gets home!


hee hee, thanks, mom for making my birthday crown again this year.

it is exactly what me and duk duk wanted, really, what with it being one part supercool, one part where the wild stinks are, and like, eleventy parts ferocious. and it is the kind of crown a wolf could wear every day really. the only thing is, and i cannot believe i am saying this, the only thing is, well, at eleventy parts ferocious, i kind of.. i kind of wish there was a ferociousness dial because even at twelve i am not sure i can always -

uh oh, mom- u better - i cannot hold- run before..o no its com-

raWwwwwwRrrrrrrrrrrrrrrrrr! :)

smello, it’s me, baxter, your roving rover reporter, reporting to u from home today because i am lucky enough to get home visits for my laser therapy. this reporter wolf’s hints for a successful laser treatment includes: barking, more barking, more barking, and oh yes, a large amount of wolf juice (that’s what the barking is for, really. o, and recipe follows..)
wolf juice
- 6 clean empty roller ball bottles
- 1/2 tablespoon corn starch mixed in 1/8 c of water to form a slurry
- about 1 to 1 1/4 cups chunky chicken water (no chunks)
note: this recipe makes about 6 roller bottles worth of wolf juice but u do not have to make that much. also, if u do not have chunky chicken water on hand, simply boil a boneless chicken breast in some water until the breast is cooked. cut or shred chicken into chunks and voila, now u have chunky chicken in chunky chicken water.
to make wolf juice, we will be making basically a very thin gravy. too thin and the wolf juice will spill out of the bottles, too thick and nothing will come out of the bottle. anyhoo, simply bring the chunky chicken water to a boil and add corn starch slurry. stir maybe about a minute, to make sure everything stays mixed and to prevent the formation of globs. once things have thickened (it will be slight), remove from heat and let cool. fill roller bottles and enjoy!

Our house has gotten fuller since tiny chumley came into our lives, not only because our lives are more enriched, but because, well, we just have more stuff. So it hardly made any sense for me to buy the chair i spied at the habitat restore a few weeks ago, but there it was, sitting in sadness outside along with all its other buy one get one free wooden misfit counterparts. Just begging to be saved.

Naw, we don’t need it, I thought as I started looking to see how easily it might be recovered. Screws on the seat underside - yeppies, but the back, hmm, oh, screws, and a weird but surely manageable tab in slot system! Metal chairs like this were always kind of cool so, eh, even though I can’t find another chair to bogo, I guess I would only be out four bucks so... sold!
The tricky part of doing an office chair of any sort is that fabric usually cannot be affixed using a staple gun. This basically turns the project into a sewing project, using traced patterns, upholstery thread and a curved upholstery needle. In tracing patterns, be very generous with seam allowances and where possible always serge (or zigzag atitch) the edge of each piece to keep things tidy and to provide the all important channel for threading fishing line where needed, because..
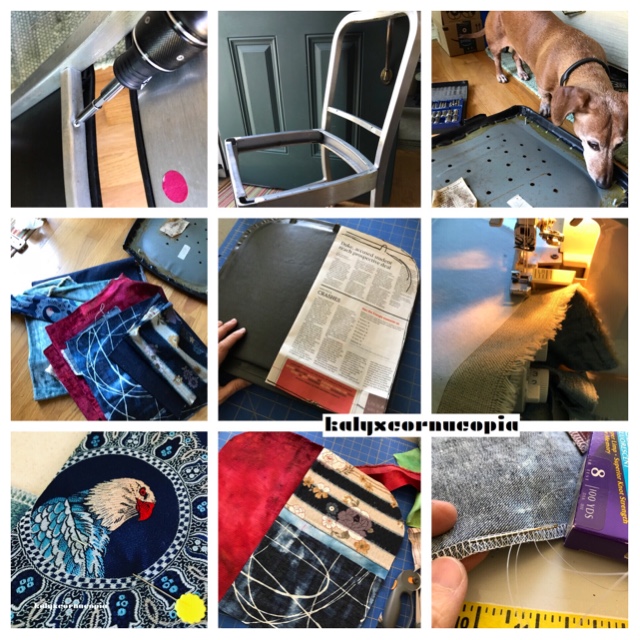
...once threaded all around, (or in this case 3/4 around) pull the fishing line taut on the fabric for the front of the seatback to create a sort of shower cap effect . This helps the fabric conform to the curves of the piece, while the large seam allowance I mentioned earlier helps minimize the wrinkles at the visible outer edge. Once the front fabric is smoothed and secured using pins, sew the back fabric in place using the curved needle and upholstery thread.

The seat bottom for this was a bit more of a challenge than I anticipated because I couldn’t easily pry open the little tabs that were holding the vinyl hostage. Plan B was to create a surface on the underside onto which I could sew the cover fabric. So just as I did with the back of the seat back, I traced a pattern and used it on fabric that had been interfaced to improve body and durability. For the seat bottom underside fabric, I also added a dart and some breather holes. After filling in some missing foam and taping all the vinyl cracks and otger susceptible areas to hopefully minimize future splits, I covered the seat bottom with a bit of batting temporarily held in place with sulky spray, then covered that with a dark indigo denim that folded over to the underside. Then and only then was it time to hand sew the denim to the piece I had made and put darts in, being careful to use clamps to maintain proper slack and tension in the denim so that the seat bottom could go back on the chair the way it was intended, with a lip over the edge.

Put everything back together and then voila!

super cool new chair for the foyer!

or, as tiny chumley would like to remind me, super cool new chair for a wolf in the foyer, dontchoo mean, mom? :)

dear diary,
i am sorry i have not written in you lately but i have been busy helping mom with an urgent makemergency. u see, little miss julia decided on sunday that she wants to be athena the goddess of war for trunk or treat on thursday and she asked if we could make athena's helmet. so we found a free basic villian helmet pattern on kamui cosplay, modified it to make it all spartany cool, cut it out of cardboard, and three very late nights later, we are almost done. it is coming along pretty nicely considering how little time we have to make it, dontchoo think? little miss julia wanted her helmet to be shiny silver which i think will be really cool bc sometime she can dress up as a roman cyclon.

anyhoo, here is also a picture of me taking a break from all that makey. and nopies that is not a mega furry cat under me. let's just say if we were not so busy with our makemergency, my whole body would be a lot stinkier right now and not in a good way but more of a purple flower stink sort of way.

anyhoo, when we are finished finished i will try and post a picture of the helmet on instygram and if mom is not looking i will also try and post a picture of the chocolate turtle i made :)
toodleydoo!
b. :)
hmmm, well i am not sure that would leave us enough for the pedal ride home and they still are very blue and not pink like i want them..so i guess i am just gonna have to take them off and..what's that?

okay, two bags of gummy worms and throw in some orange flippy flops for my friend here and u have a deal, no bag necessary!

hee hee, wait'll everybuddy sees us in school this year, right, duk duk?? :)

hee hee omg, duk duk, the way they fit, it is like these flippy flops were made for me!

u do not think they make my ankles look less ferocious, do they?

okay okay, do not get your feathers in a fluffle, duk duk. i was gonna do it already...okay, there. and still as comfy and awesome as ever. oh she's coming back...

miss market stall braavosi bazaar mom lady, me and duk duk will give u one bag of gummy worms for them and not a gummy more. :)

whoa, duk duk, those flippy flops are supercool!! but i bet if i show too much interest, she will ask a wing and a leg for them. and that's a lot of dark meat if i do say so myself. yeppies. besides i should really try them on. let me ask her.

miss market stall braavosi bazaar momlady, may my friend and i please try on this pair of really unimpressive flippy flops that probably will not even fit right and are an ugly blue color?

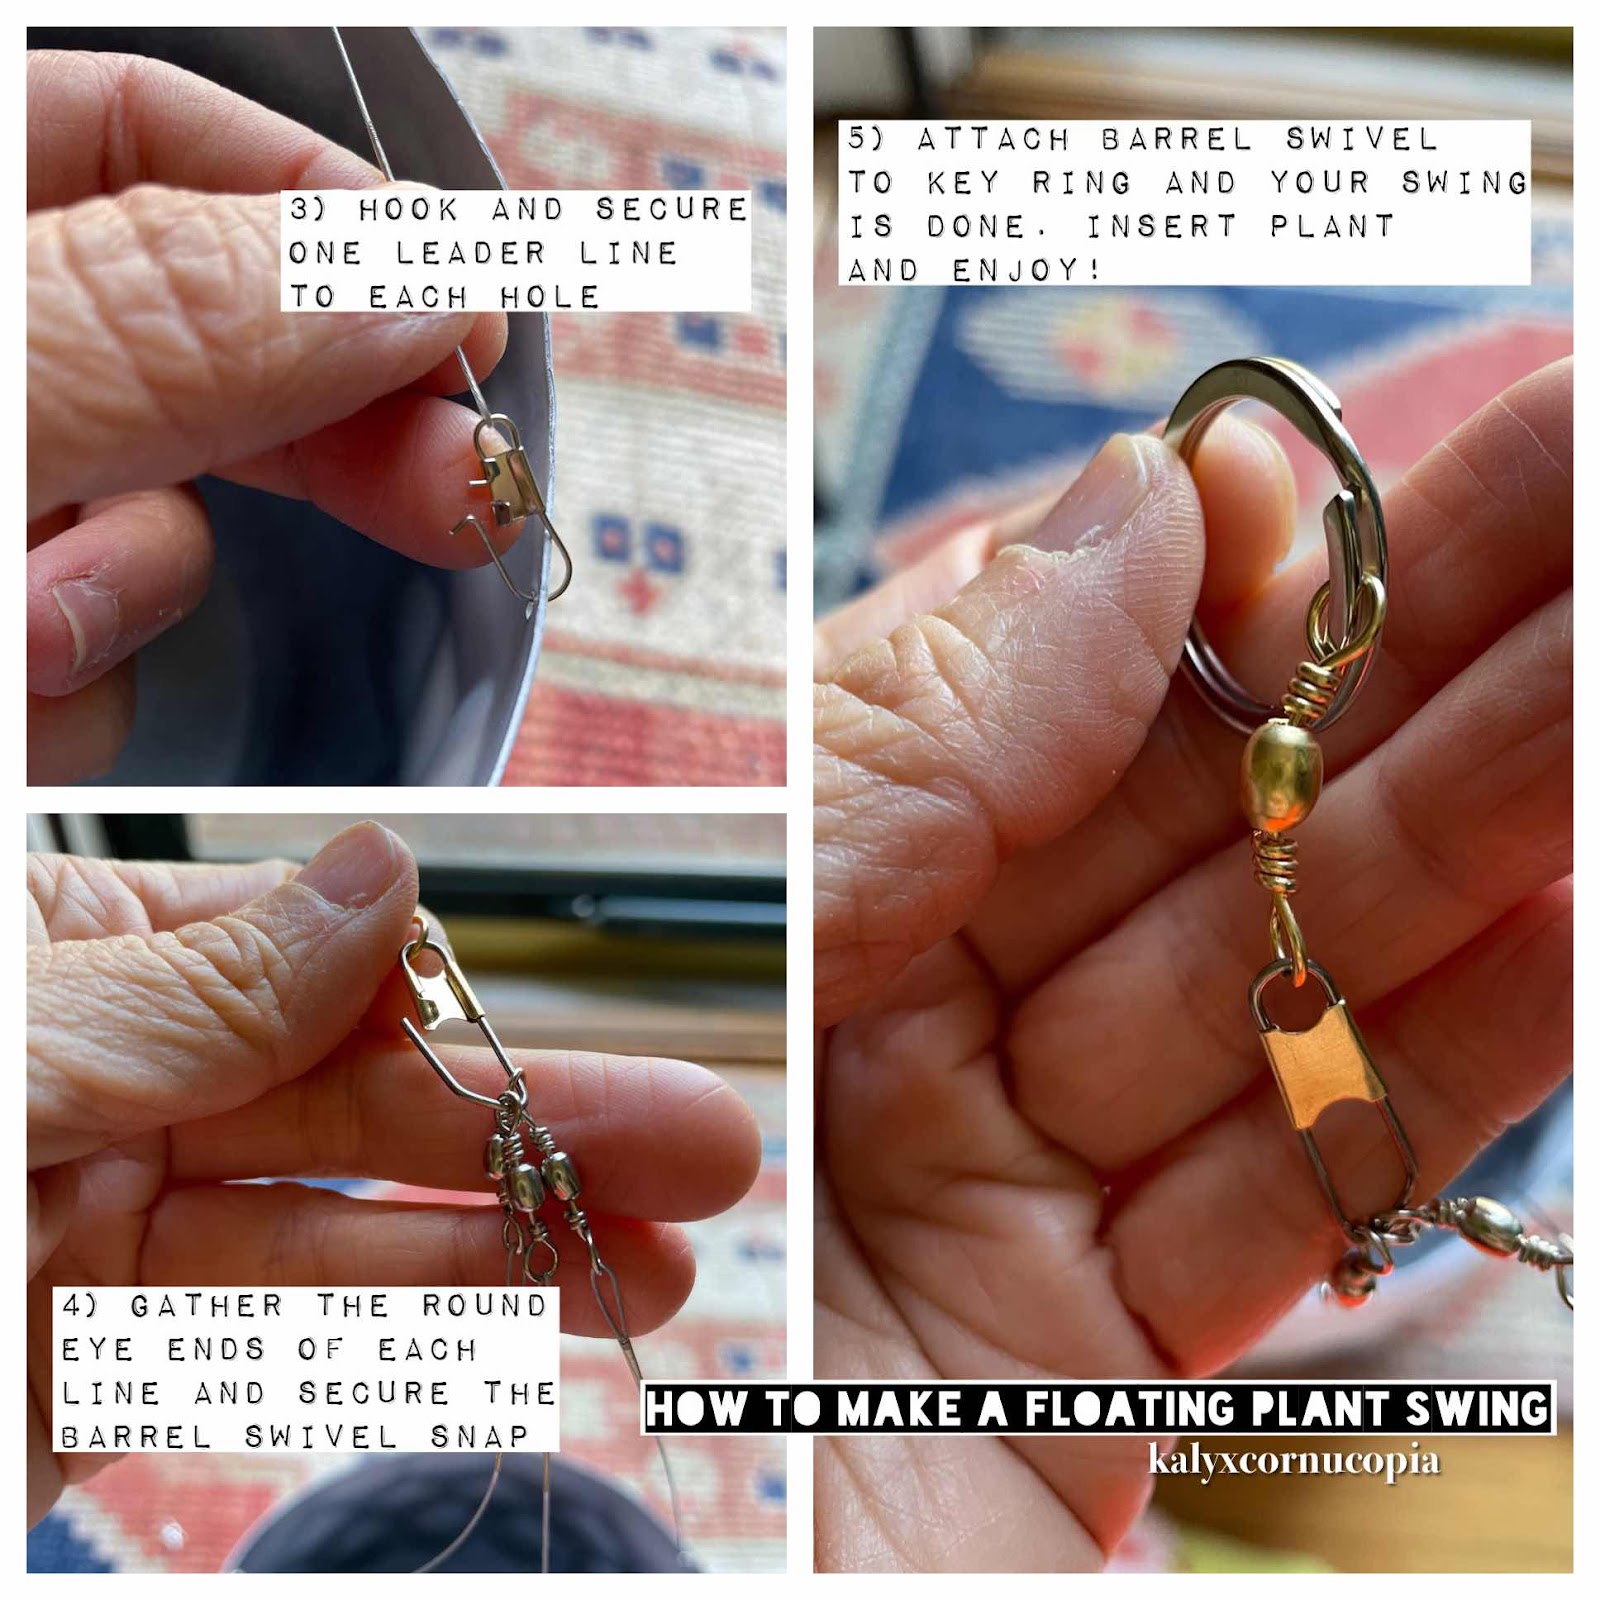
mmm-hmm. mm-hmmm. oic. a skip tooth sawblade. not a flame throwe then. ok. ok. yes with an xacto blade and a drill bit - we would have done that wouldn't we have, duk duk? o, i see - a straw for the toesie part so the ribbon does not get smooshy weird. okay, yes, we would have done most all of that. except maybe for the part where we would have probably slightly burned a few feathers but seeing as how that would have been extra, it would have been a bonus step. like the way sometimes u get a bonus question on your test for extra credit and if u answer it right it makes up for the other questions u did not answer right bc u did not study really and otherwise u would have gotten a zero instead of a one. okay, okay, some stuff we forgot to take pictures of..and, that's it? hee hee, yay are we all done? well i mean except for the glue drying part?
may we see them, please, mom?

oooOOOOOOooooooooOOOOooo!


